Docker + PostgreSQL Clusters: Sharding, Replication, and Read/Write Routing
A hands-on, practice-along guide to building a distributed PostgreSQL architecture with Docker — from Docker fundamentals through sharding, consistent hashing, streaming replication, and read/write routing, with runnable code at every step.
Published on 16 jul 2026
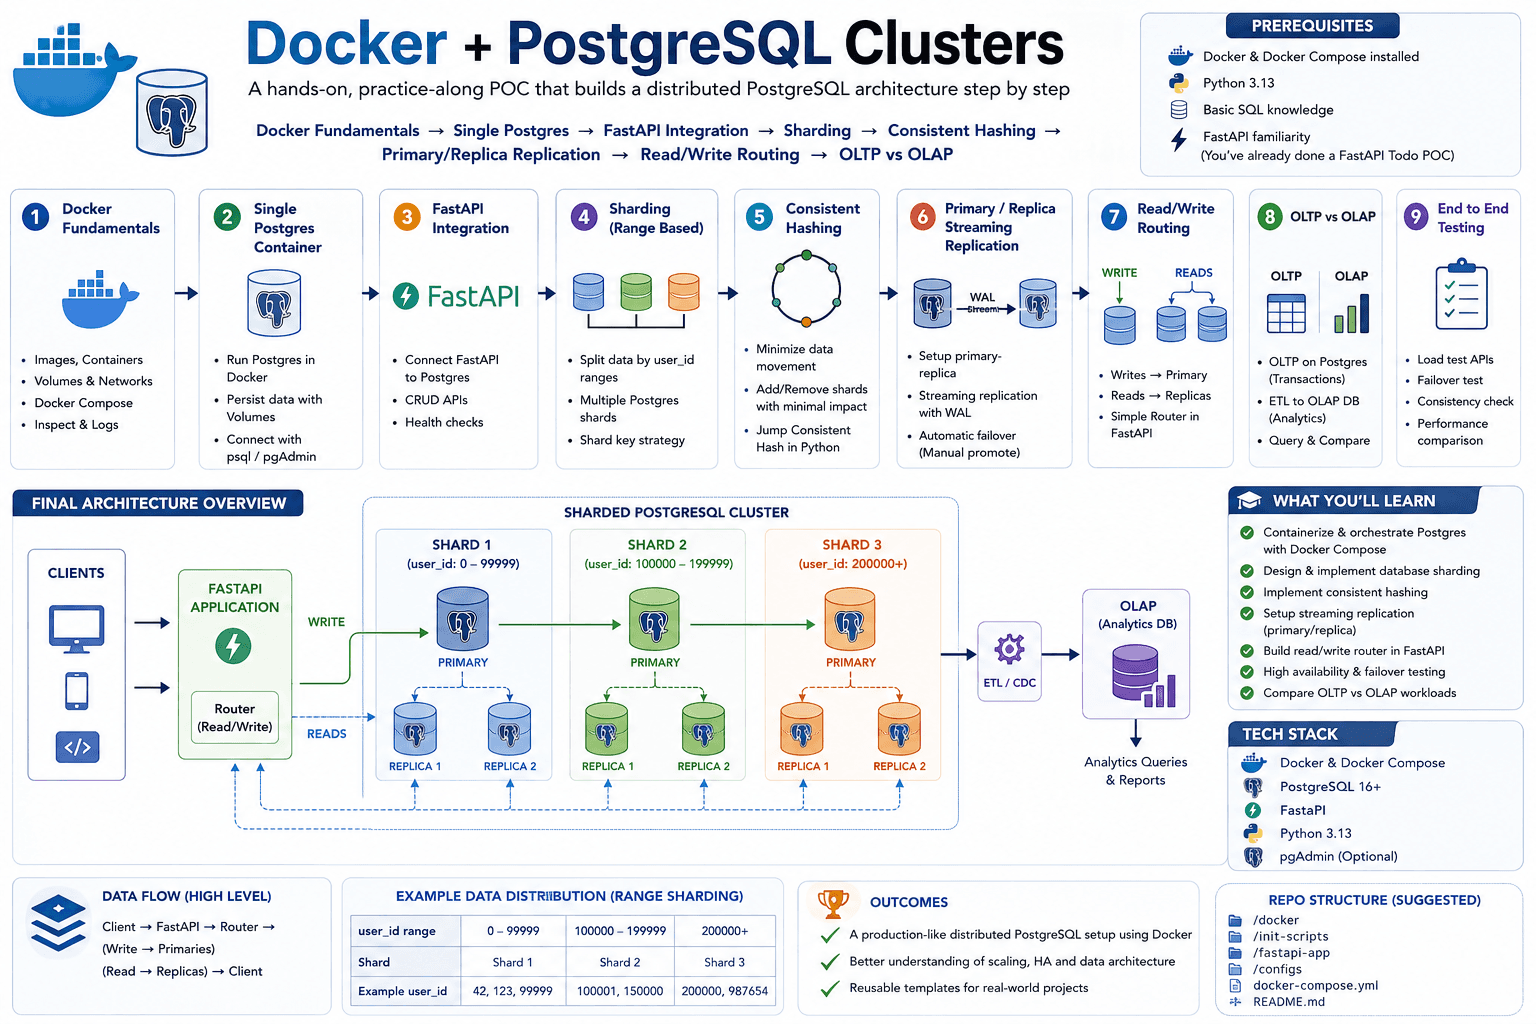
Table of Contents▶
- Final Architecture
- Roadmap
- Phase 1 — Docker Fundamentals
- Step 2 — Run PostgreSQL with Docker Compose
- Step 3 — FastAPI + PostgreSQL in Docker
- Step 4 — PostgreSQL Sharding with Docker
- Step 5 — Build the Shard Router
- Step 6 — Cross-Shard Queries (Fan-out + Merge)
- Step 7 — Consistent Hashing
- Step 8 — PostgreSQL Streaming Replication
- Step 10 — Read/Write Router
- OLTP vs OLAP
- Completion Checklist
Prerequisites: Docker & Docker Compose installed, Python 3.13, basic SQL and FastAPI familiarity (this POC assumes you've already done a FastAPI Todo POC).
Final Architecture
                    Docker Network
                         │
        ┌─────────────────────────────────────┐
        │                                     │
        │  shard0     :5441                   │
        │  shard1     :5442                   │
        │  shard2     :5443                   │
        │  shard3     :5444                   │
        │                                     │
        │  primary    :5450                   │
        │      │                              │
        │      │ Streaming Replication        │
        │      ▼                              │
        │  replica    :5451                   │
        │                                     │
        └─────────────────────────────────────┘
                       ▲
                       │
                Python Application
Roadmap
Phase 1 — Docker Fundamentals
- What is Docker? Image vs Container, Volumes, Networks, Docker Compose
Phase 2 — PostgreSQL in Docker
- Single Postgres container, persistent volume, init scripts, healthcheck
Phase 3 — Multiple Postgres Containers
shard0,shard1,shard2,shard3— each an independent database
Phase 4 — Database Sharding
- Modulo hashing, consistent hashing, cross-shard queries
Phase 5 — Primary / Replica
- Real PostgreSQL streaming replication
Phase 6 — Read/Write Router
INSERT / UPDATE / DELETE  →  Primary
SELECT                    →  Replica
Phase 7 — Replication Lag
- WAL, LSN, read-your-writes, sticky sessions
Phase 1 — Docker Fundamentals
What is Docker?
Normally, running PostgreSQL means installing it directly on your machine — plus Python, Redis, RabbitMQ, etc. This causes: different versions across machines, "works on my machine" issues, hard setup, and dependency conflicts. Docker solves this by packaging everything into isolated containers.
Image vs Container
Think of it like a class → object or recipe → cake relationship:
Image
   ↓
Container
postgres:17 is an image. Running docker run postgres:17 creates a container.
- Image: read-only. Contains Linux, PostgreSQL, config, default files. You can't change the image itself.
- Container: a running instance of an image. You can
docker stop,docker start, ordocker rmit — the image still exists.
Why Volumes?
If you insert data into a container and then docker rm it, without a volume everything is gone. With a volume, the database's data files live on the host, so data survives container removal.
Why Networks?
Two containers (e.g. Python app + Postgres) can't easily talk to each other without a shared Docker network. With one, the Python app connects using the container name (postgres:5432) instead of localhost.
Why Docker Compose?
Without it, you'd run multiple docker run ... commands manually. With docker compose up, everything starts together from one config file.
Project Folder Structure
docker-postgres-poc/
├── docker-compose.yml
├── .env
├── app/
└── README.md
Your Task
mkdir docker-postgres-poc
cd docker-postgres-poc
Create the structure above, then move to Step 2.
Step 2 — Run PostgreSQL with Docker Compose
Project Structure
docker-postgres-poc/
├── docker-compose.yml
├── .env
├── app/
└── postgres/
    └── init.sql
1. .env
POSTGRES_USER=postgres
POSTGRES_PASSWORD=postgres
POSTGRES_DB=todo_db

POSTGRES_PORT=5432
2. docker-compose.yml
version: '3.9'

services:
  postgres:
    image: postgres:17
    container_name: postgres-db
    restart: unless-stopped

    environment:
      POSTGRES_USER: ${POSTGRES_USER}
      POSTGRES_PASSWORD: ${POSTGRES_PASSWORD}
      POSTGRES_DB: ${POSTGRES_DB}

    ports:
      - '${POSTGRES_PORT}:5432'

    volumes:
      - postgres_data:/var/lib/postgresql/data
      - ./postgres/init.sql:/docker-entrypoint-initdb.d/init.sql

    healthcheck:
      test: ['CMD-SHELL', 'pg_isready -U postgres']
      interval: 5s
      timeout: 5s
      retries: 5

volumes:
  postgres_data:
3. postgres/init.sql
Runs only the first time the database is created.
CREATE TABLE todos (
    id SERIAL PRIMARY KEY,
    title VARCHAR(255) NOT NULL,
    completed BOOLEAN DEFAULT FALSE,
    created_at TIMESTAMP DEFAULT CURRENT_TIMESTAMP
);

INSERT INTO todos (title)
VALUES
('Learn Docker'),
('Learn PostgreSQL');
4. Start the Container
docker compose up -d
5. Verify
docker ps
6. Check Logs
docker logs postgres-db
Look for: database system is ready to accept connections
7. Connect
docker exec -it postgres-db psql -U postgres -d todo_db
8. Verify the Table
\dt
SELECT * FROM todos;
Expected:
 id |      title       | completed
----+------------------+----------
 1  | Learn Docker     | false
 2  | Learn PostgreSQL | false
Exit with \q.
9. Stop and Start
docker compose stop
docker compose start
Data persists thanks to the postgres_data volume.
What You Learned
- Running PostgreSQL in Docker
- Environment variables via
.env - Port mapping (
5432:5432) - Persistent storage with volumes
- Initializing a DB with
init.sql - Health checks
- Basic Compose lifecycle:
up,stop,start,logs,ps,exec
Step 3 — FastAPI + PostgreSQL in Docker
Goal
                Docker Network
                     │
        ┌──────────────────────────┐
        │                          │
        │  FastAPI (api)           │
        │         │                │
        │         ▼                │
        │  PostgreSQL (postgres)   │
        │                          │
        └──────────────────────────┘
The API connects to postgres, not localhost.
Project Structure
docker-postgres-poc/
├── docker-compose.yml
├── .env
├── postgres/
│   └── init.sql
└── app/
    ├── Dockerfile
    ├── requirements.txt
    ├── main.py
    └── database.py
1. app/requirements.txt
fastapi
uvicorn[standard]
sqlalchemy
psycopg[binary]
2. app/Dockerfile
FROM python:3.13-slim

WORKDIR /app

COPY requirements.txt .

RUN pip install --no-cache-dir -r requirements.txt

COPY . .

CMD ["uvicorn", "main:app", "--host", "0.0.0.0", "--port", "8000"]
3. app/database.py
from sqlalchemy import create_engine

DATABASE_URL = (
    "postgresql+psycopg://postgres:postgres@postgres:5432/todo_db"
)

engine = create_engine(DATABASE_URL)
Why postgres as the hostname? In Docker Compose, the service name (postgres: in the YAML) becomes the hostname on the Docker network. localhost:5432 would refer to the API container itself, not the database container — so it won't work.
4. app/main.py
from fastapi import FastAPI
from sqlalchemy import text

from database import engine

app = FastAPI()


@app.get("/")
def home():
    return {"message": "FastAPI is running"}


@app.get("/todos")
def todos():
    with engine.connect() as conn:
        rows = conn.execute(
            text("SELECT * FROM todos")
        ).mappings().all()

    return rows
5. Update docker-compose.yml
services:
  postgres:
    ...
    # keep your existing postgres configuration

  api:
    build: ./app
    container_name: todo-api
    ports:
      - '8000:8000'
    depends_on:
      postgres:
        condition: service_healthy
    volumes:
      - ./app:/app
depends_on with condition: service_healthy ensures the API waits until PostgreSQL passes its health check before starting.
6. Start Everything
docker compose up --build
7. Test the API
http://localhost:8000→{"message": "FastAPI is running"}http://localhost:8000/todos→ the seeded todo rows as JSON
8. Verify the Network
docker ps
docker network ls
docker network inspect docker-postgres-poc_default
Both postgres-db and todo-api should be attached to the same network.
What You Learned
- Building a custom image with a
Dockerfile - Running multiple services with Compose
- How Compose creates a private network
- Why containers use service names instead of
localhost - Connecting FastAPI to PostgreSQL via SQLAlchemy
depends_onwith a health check- Mounting source code as a volume for development
Step 4 — PostgreSQL Sharding with Docker
Goal
Run 4 independent PostgreSQL instances instead of one:
                     Python App
                          │
                Shard Router (Modulo)
                          │
      ┌──────────┬──────────┬──────────┬──────────┐
      ▼          ▼          ▼          ▼
   shard0     shard1     shard2     shard3
   :5441      :5442      :5443      :5444
Each shard has its own database, data files, volume, and port.
Why Sharding?
A single database with 500 million rows becomes huge, slow, and hard to scale vertically. Splitting the data means each database stores only a fraction — e.g. with 4 shards, roughly 25% each.
Project Structure
docker-postgres-poc/
├── docker-compose.yml
├── shard0/
│   └── init.sql
├── shard1/
│   └── init.sql
├── shard2/
│   └── init.sql
├── shard3/
│   └── init.sql
└── app/
    ├── main.py
    ├── shard_router.py
    └── database.py
Step 1 — Init Scripts (same schema for all shards)
shard0/init.sql (copy identically to shard1/2/3):
CREATE TABLE orders (
    id SERIAL PRIMARY KEY,
    user_id INT NOT NULL,
    amount NUMERIC NOT NULL
);
Step 2 — docker-compose.yml
version: '3.9'

services:
  shard0:
    image: postgres:17
    container_name: shard0
    environment:
      POSTGRES_USER: postgres
      POSTGRES_PASSWORD: postgres
      POSTGRES_DB: shardapp
    ports:
      - '5441:5432'
    volumes:
      - shard0_data:/var/lib/postgresql/data
      - ./shard0/init.sql:/docker-entrypoint-initdb.d/init.sql

  shard1:
    image: postgres:17
    container_name: shard1
    environment:
      POSTGRES_USER: postgres
      POSTGRES_PASSWORD: postgres
      POSTGRES_DB: shardapp
    ports:
      - '5442:5432'
    volumes:
      - shard1_data:/var/lib/postgresql/data
      - ./shard1/init.sql:/docker-entrypoint-initdb.d/init.sql

  shard2:
    image: postgres:17
    container_name: shard2
    environment:
      POSTGRES_USER: postgres
      POSTGRES_PASSWORD: postgres
      POSTGRES_DB: shardapp
    ports:
      - '5443:5432'
    volumes:
      - shard2_data:/var/lib/postgresql/data
      - ./shard2/init.sql:/docker-entrypoint-initdb.d/init.sql

  shard3:
    image: postgres:17
    container_name: shard3
    environment:
      POSTGRES_USER: postgres
      POSTGRES_PASSWORD: postgres
      POSTGRES_DB: shardapp
    ports:
      - '5444:5432'
    volumes:
      - shard3_data:/var/lib/postgresql/data
      - ./shard3/init.sql:/docker-entrypoint-initdb.d/init.sql

volumes:
  shard0_data:
  shard1_data:
  shard2_data:
  shard3_data:
Step 3 — Start
docker compose up -d
docker ps
Expected containers: shard0, shard1, shard2, shard3.
Step 4 — Verify Each Database
docker exec -it shard0 psql -U postgres -d shardapp
\dt
Expected: orders. Repeat for shard1, shard2, shard3.
Step 5 — Why Four Databases?
Data routing example based on user_id % 4:
| User ID | Shard |
|---|---|
| 1 | shard1 |
| 2 | shard2 |
| 3 | shard3 |
| 4 | shard0 |
| 5 | shard1 |
| 6 | shard2 |
| 7 | shard3 |
| 8 | shard0 |
1 % 4 = 1  -> shard1
2 % 4 = 2  -> shard2
3 % 4 = 3  -> shard3
4 % 4 = 0  -> shard0
8 % 4 = 0  -> shard0
What You Learned
- Why sharding is needed
- Running multiple PostgreSQL instances
- Separate volumes per shard
- Initializing multiple databases with
init.sql - Modulo-based data distribution
- Managing multiple containers with Compose
Step 5 — Build the Shard Router
Goal
           Application
                │
                ▼
        ┌─────────────────┐
        │  Shard Router   │
        └─────────────────┘
          │   │   │   │
          ▼   ▼   ▼   ▼
      shard0 shard1 shard2 shard3
The router decides which shard to write to / read from.
Project Structure
app/
├── main.py
├── database.py
├── shard_router.py
└── models.py
Step 1 — Connections to Every Shard
database.py
from sqlalchemy import create_engine

DATABASES = {
    0: create_engine(
        "postgresql+psycopg://postgres:postgres@shard0:5432/shardapp"
    ),
    1: create_engine(
        "postgresql+psycopg://postgres:postgres@shard1:5432/shardapp"
    ),
    2: create_engine(
        "postgresql+psycopg://postgres:postgres@shard2:5432/shardapp"
    ),
    3: create_engine(
        "postgresql+psycopg://postgres:postgres@shard3:5432/shardapp"
    ),
}
Note: connections use Docker service names (shard0, shard1, ...) as hostnames.
Step 2 — The Router
shard_router.py
from database import DATABASES


class ShardRouter:

    TOTAL_SHARDS = 4

    @staticmethod
    def get_shard(user_id: int):
        shard_id = user_id % ShardRouter.TOTAL_SHARDS
        return DATABASES[shard_id]
| user_id | Calculation | Database |
|---|---|---|
| 1 | 1 % 4 = 1 | shard1 |
| 2 | 2 % 4 = 2 | shard2 |
| 3 | 3 % 4 = 3 | shard3 |
| 4 | 4 % 4 = 0 | shard0 |
| 5 | 5 % 4 = 1 | shard1 |
The same user_id always maps to the same shard.
Step 3 — Write Orders
main.py
from fastapi import FastAPI
from sqlalchemy import text

from shard_router import ShardRouter

app = FastAPI()


@app.post("/orders")
def create_order(user_id: int, amount: float):

    engine = ShardRouter.get_shard(user_id)

    with engine.begin() as conn:
        conn.execute(
            text("""
                INSERT INTO orders(user_id, amount)
                VALUES (:user_id, :amount)
            """),
            {
                "user_id": user_id,
                "amount": amount,
            },
        )

    return {
        "status": "created",
        "shard": user_id % 4,
    }
Step 4 — Read Orders
@app.get("/orders/{user_id}")
def get_orders(user_id: int):

    engine = ShardRouter.get_shard(user_id)

    with engine.connect() as conn:
        rows = conn.execute(
            text("""
                SELECT *
                FROM orders
                WHERE user_id=:user_id
            """),
            {
                "user_id": user_id,
            },
        ).mappings().all()

    return rows
Step 5 — Test It
POST /orders?user_id=1&amount=100
POST /orders?user_id=2&amount=250
POST /orders?user_id=3&amount=500
POST /orders?user_id=4&amount=900
POST /orders?user_id=5&amount=50
Responses show which shard each order landed on:
{"status":"created","shard":1}
{"status":"created","shard":2}
{"status":"created","shard":3}
{"status":"created","shard":0}
{"status":"created","shard":1}
Verify
docker exec -it shard1 psql -U postgres -d shardapp
SELECT * FROM orders;
Only that shard's assigned users' records should appear.
Why Point Reads Are Fast
For user_id = 9: 9 % 4 = 1 → go directly to shard1 → read only a fraction of total data, instead of scanning one giant table.
What You Learned
- Maintaining connections to multiple databases
- Modulo-based shard routing
- Direct point reads
- Distributed writes
- Why sharding improves scalability for user-partitioned data
Step 6 — Cross-Shard Queries (Fan-out + Merge)
Goal
Implement APIs that work across all shards: total revenue, total orders, orders per shard, top customers.
                    FastAPI
                       │
              Aggregate Service
                       │
        ┌────────┬────────┬────────┬────────┐
        ▼        ▼        ▼        ▼
     shard0   shard1   shard2   shard3
        │        │        │        │
        └────────┴────────┴────────┘
                 Merge Results
                       │
                  JSON Response
Why Is This Needed?
No single shard has the full picture. A question like "What is today's total revenue?" requires querying all four databases and merging the results.
Step 1 — Update shard_router.py
from database import DATABASES

class ShardRouter:

    TOTAL_SHARDS = 4

    @staticmethod
    def get_shard(user_id: int):
        return DATABASES[user_id % ShardRouter.TOTAL_SHARDS]

    @staticmethod
    def get_all_shards():
        return DATABASES.values()
Step 2 — Total Revenue API
from sqlalchemy import text
from shard_router import ShardRouter


@app.get("/analytics/revenue")
def total_revenue():

    total = 0

    for engine in ShardRouter.get_all_shards():

        with engine.connect() as conn:

            result = conn.execute(
                text("""
                    SELECT COALESCE(SUM(amount),0)
                    FROM orders
                """)
            )

            total += result.scalar()

    return {
        "total_revenue": float(total)
    }
Step 3 — Total Orders
@app.get("/analytics/orders")
def total_orders():

    total = 0

    for engine in ShardRouter.get_all_shards():

        with engine.connect() as conn:

            result = conn.execute(
                text("""
                    SELECT COUNT(*)
                    FROM orders
                """)
            )

            total += result.scalar()

    return {
        "orders": total
    }
Step 4 — Orders Per Shard
@app.get("/analytics/shards")
def shard_stats():

    stats = []

    for index, engine in enumerate(ShardRouter.get_all_shards()):

        with engine.connect() as conn:

            count = conn.execute(
                text("""
                    SELECT COUNT(*)
                    FROM orders
                """)
            ).scalar()

            stats.append({
                "shard": index,
                "orders": count,
            })

    return stats
Step 5 — Global Order List
@app.get("/orders")
def all_orders():

    rows = []

    for engine in ShardRouter.get_all_shards():

        with engine.connect() as conn:

            data = conn.execute(
                text("""
                    SELECT *
                    FROM orders
                """)
            ).mappings().all()

            rows.extend(data)

    return rows
The Trade-off
Point read (fast): user_id=7 → 7%4=3 → query shard3 only. One database queried.
Global query (slower, "fan-out"): revenue = shard0 + shard1 + shard2 + shard3, merged. Every shard queried.
With 4 shards that's 4 queries; with 100 shards, 100 queries. Large systems solve this with dedicated analytics databases / data warehouses (ClickHouse, BigQuery), streaming pipelines, or precomputed aggregates — rather than fanning out live queries at scale.
What You Learned
- Fan-out queries
- Application-side aggregation
- Global analytics in a sharded system
- Trade-offs between point reads and global queries
- Why OLTP databases are often paired with OLAP systems for reporting
Step 7 — Consistent Hashing
Why Modulo Sharding Is a Problem
With 4 shards, user_id % 4 works fine — until you add a 5th shard and switch to user_id % 5:
| User | Before (%4) | After (%5) |
|---|---|---|
| 1 | shard1 | shard1 |
| 2 | shard2 | shard2 |
| 3 | shard3 | shard3 |
| 4 | shard0 | shard4 ❌ |
| 5 | shard1 | shard0 ❌ |
| 6 | shard2 | shard1 ❌ |
| 7 | shard3 | shard2 ❌ |
| 8 | shard0 | shard3 ❌ |
Almost every key moves. With 100 million users, you may need to migrate ~80% of the data — unacceptable in production.
The Better Solution — a Hash Ring
Instead of assigning users directly to shards, place both keys and shards on a logical ring. Each user is stored on the first shard clockwise from its hash position.
Step 1 — Create the Ring
app/consistent_hash.py
import hashlib
import bisect


class ConsistentHash:

    def __init__(self, shards, virtual_nodes=100):
        self.ring = {}
        self.sorted_keys = []
        self.virtual_nodes = virtual_nodes

        for shard in shards:
            for vnode in range(virtual_nodes):

                key = f"{shard}-{vnode}"

                hash_value = int(
                    hashlib.md5(key.encode()).hexdigest(),
                    16,
                )

                self.ring[hash_value] = shard
                self.sorted_keys.append(hash_value)

        self.sorted_keys.sort()
Why virtual nodes? Without them, an unlucky shard could get much more data than others (only 4 ring positions for 4 shards). With 100 virtual nodes per shard (400 total positions for 4 shards), distribution becomes far more even.
Step 2 — Find the Correct Shard
def get_shard(self, key: int):

    key_hash = int(
        hashlib.md5(str(key).encode()).hexdigest(),
        16,
    )

    index = bisect.bisect(self.sorted_keys, key_hash)

    if index == len(self.sorted_keys):
        index = 0

    return self.ring[self.sorted_keys[index]]
Step 3 — Initialize the Ring
from consistent_hash import ConsistentHash

hash_ring = ConsistentHash(
    shards=[
        "shard0",
        "shard1",
        "shard2",
        "shard3",
    ]
)
Step 4 — Route Requests
Replace user_id % 4 with:
shard = hash_ring.get_shard(user_id)
engine = DATABASES[shard]
Step 5 — Compare the Two Approaches
for user in range(1, 11):
    print(
        user,
        user % 4,
        hash_ring.get_shard(user),
    )
Step 6 — Simulate Adding a New Shard
Initially: ConsistentHash(["shard0", "shard1", "shard2", "shard3"])
Later: ConsistentHash(["shard0", "shard1", "shard2", "shard3", "shard4"])
- Modulo sharding: ~80% of keys move when going from 4 to 5 shards.
- Consistent hashing: ~20% of keys move (roughly the new shard's fair share).
Why Large Companies Use It
Consistent hashing (or variants) powers Apache Cassandra, Amazon Dynamo-style databases, Riak, Memcached client libraries, and distributed caches — it lets clusters grow or shrink without massive data migration.
What You Learned
- Why modulo sharding doesn't scale well
- How consistent hashing works
- The purpose of virtual nodes
- Using binary search (
bisect) to find the correct shard efficiently - Why adding a new shard moves only a small fraction of data
Step 8 — PostgreSQL Streaming Replication
Key idea: Sharding distributes data; Read Replicas distribute read traffic.
Goal
                    Client
                       │
             ┌─────────┴─────────┐
             │                   │
         INSERT/UPDATE        SELECT
             │                   │
             ▼                   ▼
        ┌──────────┐      ┌──────────┐
        │ Primary  │=====>│ Replica  │
        └──────────┘  WAL  └──────────┘
Why Read Replicas?
A single database handling both heavy writes and heavy reads (e.g. 5,000 writes/sec + 100,000 reads/sec) becomes overloaded. Splitting reads to replicas relieves the primary.
What Is WAL?
WAL = Write-Ahead Log. Every change is written to a log before it's applied to the table:
1. Write to WAL → 2. Flush WAL to disk → 3. Update table → 4. Replica replays WAL
This guarantees durability and enables replication. The replica does not execute SQL directly — it replays WAL records.
Project Structure
docker-postgres-poc/
├── docker-compose.yml
├── primary/
│   ├── Dockerfile
│   ├── postgresql.conf
│   ├── pg_hba.conf
│   └── init.sql
├── replica/
│   ├── Dockerfile
│   └── setup.sh
└── app/
Step 1 — Add the Primary
services:
  primary:
    image: postgres:17
    container_name: primary
    environment:
      POSTGRES_USER: postgres
      POSTGRES_PASSWORD: postgres
      POSTGRES_DB: repdemo
    ports:
      - '5450:5432'
    volumes:
      - primary_data:/var/lib/postgresql/data
Step 2 — Add the Replica
replica:
  image: postgres:17
  container_name: replica
  ports:
    - '5451:5432'
  depends_on:
    - primary
Initially it's just another Postgres instance — later steps turn it into a true streaming replica.
Primary vs Replica
| Feature | Primary | Replica |
|---|---|---|
| INSERT | ✅ | ❌ |
| UPDATE | ✅ | ❌ |
| DELETE | ✅ | ❌ |
| SELECT | ✅ | ✅ |
| Generates WAL | ✅ | ❌ |
| Replays WAL | ❌ | ✅ |
Why Can't We Write to the Replica?
If the replica were writable directly, a conflicting update on the replica could clash with the next WAL record from the primary — which value wins? To avoid this, PostgreSQL makes replicas read-only.
Replication Lag
Replication is asynchronous by default — there's a small delay between a primary write and the replica reflecting it. Immediately reading from the replica after a write may return stale data. This delay is replication lag.
What You Learned
- Why read replicas exist
- Difference between sharding and replication
- What WAL is
- How streaming replication works
- Why replicas are read-only
- What replication lag is and why it happens
The next configuration step (configuring
postgresql.conf/pg_hba.conf, creating a replication user, runningpg_basebackup, starting the replica in recovery mode, and verifying viapg_stat_replication) turns these two containers into a real primary/replica pair.
Step 10 — Read/Write Router
Goal
                   FastAPI
                      │
               Read/Write Router
                ┌────────────┐
                │            │
                ▼            ▼
           Primary       Replica
          (Writes)       (Reads)
The primary handles only writes; replicas serve reads — avoiding a single bottleneck.
Step 1 — Configure Connections
database.py
from sqlalchemy import create_engine

PRIMARY = create_engine(
    "postgresql+psycopg://postgres:postgres@primary:5432/repdemo"
)

REPLICA = create_engine(
    "postgresql+psycopg://postgres:postgres@replica:5432/repdemo"
)
Step 2 — The Router
read_write_router.py
from database import PRIMARY, REPLICA


class ReadWriteRouter:

    @staticmethod
    def read():
        return REPLICA

    @staticmethod
    def write():
        return PRIMARY
Step 3 — Write Endpoint
from fastapi import FastAPI
from sqlalchemy import text

from read_write_router import ReadWriteRouter

app = FastAPI()


@app.post("/accounts/{account_id}/deposit")
def deposit(account_id: int, amount: float):

    engine = ReadWriteRouter.write()

    with engine.begin() as conn:

        conn.execute(
            text("""
                UPDATE accounts
                SET balance = balance + :amount
                WHERE id = :id
            """),
            {
                "id": account_id,
                "amount": amount,
            },
        )

    return {"status": "success"}
Step 4 — Read Endpoint
@app.get("/accounts/{account_id}")
def account(account_id: int):

    engine = ReadWriteRouter.read()

    with engine.connect() as conn:

        row = conn.execute(
            text("""
                SELECT *
                FROM accounts
                WHERE id=:id
            """),
            {"id": account_id},
        ).mappings().first()

    return row
Problem — Replication Lag
A write to the primary followed immediately by a read from the replica may return stale data if the WAL hasn't been replayed yet.
Solution 1 — Sticky Sessions
After a write, keep reading from the primary for a short window (e.g. 1 second) before falling back to the replica.
import time

from database import PRIMARY, REPLICA


class ReadWriteRouter:

    STICKY_WINDOW = 1.0

    recent_writes = {}

    @classmethod
    def write(cls, session_id):

        cls.recent_writes[session_id] = time.time()

        return PRIMARY

    @classmethod
    def read(cls, session_id):

        last_write = cls.recent_writes.get(session_id)

        if (
            last_write
            and time.time() - last_write < cls.STICKY_WINDOW
        ):
            return PRIMARY

        return REPLICA
Solution 2 — Read-Your-Writes with LSN
A stronger-consistency approach: after writing on the primary, check the current WAL position:
SELECT pg_current_wal_lsn();
-- e.g. 0/16A0C80
Then on the replica, check whether it has caught up:
SELECT pg_last_wal_replay_lsn();
If the replica hasn't reached that LSN yet, wait briefly and retry before reading. This ensures the read reflects the write, waiting only as long as necessary — and avoids permanently overloading the primary the way sticky sessions can.
What You Learned
- Read/write splitting
- Primary and replica connections
- Automatic query routing
- Sticky sessions for recent writes
- Replication lag
- Read-your-writes consistency
- LSN-based synchronization
OLTP vs OLAP
Understanding this distinction explains why companies like Amazon, Netflix, Uber, and Google run both PostgreSQL (OLTP) and ClickHouse/Snowflake/BigQuery (OLAP).
What is OLTP?
Online Transaction Processing — runs the application: login, register, place order, transfer money, book ticket, create todo.
- Thousands of small transactions
- Read/write individual rows
- Low latency (milliseconds)
- ACID transactions
SELECT * FROM orders WHERE id = 1;
Returns one row, fast.
What is OLAP?
Online Analytical Processing — analyzes large amounts of data: total revenue, DAU/MAU, top products, dashboards, BI.
SELECT DATE(created_at), SUM(amount)
FROM orders
GROUP BY DATE(created_at);
Scans millions or billions of rows.
The Problem
If a dashboard runs SELECT SUM(amount) FROM orders against a 500-million-row OLTP table while users are actively checking out, the analytics query consumes CPU/memory/I/O that users need — causing slow checkout, login, and payments.
The Solution — Separate the Workloads
               Application
                     │
          ┌──────────┴──────────┐
          ▼                     ▼
      PostgreSQL          ClickHouse
       (OLTP)               (OLAP)
      Transactions       Analytics
- PostgreSQL handles: create order, update inventory, payment, shipping.
- ClickHouse handles: total revenue, top products, DAU/WAU/MAU, feature usage.
Why ClickHouse?
PostgreSQL stores data row by row. ClickHouse stores data column by column — so SELECT SUM(price) reads only the price column, making analytical scans over billions of rows much faster.
Architecture Used by Large Companies
Users → FastAPI → PostgreSQL (OLTP) → CDC / Kafka / Events → ClickHouse (OLAP)
                                                                    │
                                                                    ▼
                                                    Grafana / Metabase / Superset
                                                                    │
                                                                    ▼
                                                          Business Dashboards
Why Not Write to Both Databases Directly?
save_order_postgres()
save_order_clickhouse()
If PostgreSQL succeeds but ClickHouse is down, the customer sees the order but the dashboard doesn't — inconsistent data.
Better approach:
PostgreSQL → Order Created → Event Queue → Consumer → ClickHouse
If ClickHouse is temporarily unavailable, the event just waits in the queue.
Where CDC Fits
Some companies don't publish events from the application at all:
Application → PostgreSQL → WAL → Debezium → Kafka → ClickHouse
This is Change Data Capture (CDC) — the app only writes to PostgreSQL, and Debezium reads the WAL to stream inserts/updates/deletes to Kafka automatically.
Real-World Examples
| Company | Flow |
|---|---|
| Amazon | Order Service → Aurora PostgreSQL → Kafka → Redshift |
| Uber | Trip Service → MySQL → Kafka → Apache Pinot |
| PostHog | React App → trackEvent() → PostHog → ClickHouse → Dashboard |
Note: the application database isn't queried for dashboard analytics — event data goes straight into the OLAP store.
Summary Table
| OLTP (PostgreSQL) | OLAP (ClickHouse) |
|---|---|
| Run the application | Analyze the business |
| Many small transactions | Large aggregations |
| INSERT, UPDATE, DELETE | SUM, COUNT, GROUP BY |
| Millisecond latency | High-throughput analytical scans |
| Row-oriented storage | Column-oriented storage |
| ACID transactions | Optimized for reporting and analytics |
Rule of thumb:
- OLTP answers: "Can this user place an order right now?"
- OLAP answers: "How many orders were placed this month, by region, and what's the total revenue?"
A Learning Progression
Start simple, synchronous:
FastAPI
├── Save Todo → PostgreSQL
└── Save Event → ClickHouse
Then evolve to a decoupled, production-style design:
FastAPI → PostgreSQL → RabbitMQ / Kafka → Worker → ClickHouse
This lets you first learn how both databases work individually, then learn to decouple them with asynchronous messaging — the pattern used in production.
Completion Checklist
- Docker fundamentals (images, containers, volumes, networks, Compose)
- PostgreSQL running in Docker with persistent storage
- FastAPI connected to PostgreSQL over the Docker network
- Multiple independent PostgreSQL shards
- Modulo-based shard routing (point reads & writes)
- Cross-shard fan-out + merge queries
- Consistent hashing with virtual nodes
- Primary/replica streaming replication concepts (WAL)
- Read/write router with sticky sessions and LSN-based consistency
- OLTP vs OLAP architecture and CDC